How to paint a rose in watercolor
TEN STEPS.
Bonjour!!
This is my first time writing a tutorial! Wish me luck.
This is mainly for the group watercolorists wich is planning run some tutorials in a lot of areas every three months (if people join, of course). So if you want to share your skills in anything related to watercolors (how to paint, brands, paper, tehcnique, business, etc) you will be VERY welcome.
If you're reading this, it means you somehow love roses or do have some interest in paintint it. Or you're a BIG curious, haha.
Whatever. I'm here to show you one of my ways to paint roses.
I love lists, so:
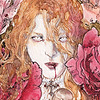
![]() There's a lot of roses types. Our category here will be a sweet modern garden rose. (The popular rose that looks like a rose in fact, haha.)
There's a lot of roses types. Our category here will be a sweet modern garden rose. (The popular rose that looks like a rose in fact, haha.)
![]() If my memory is good enough, since the pic is old and had been on my phone from a long time, it is an hybrid tea rose from David Austin. Read more here.
If my memory is good enough, since the pic is old and had been on my phone from a long time, it is an hybrid tea rose from David Austin. Read more here.
![]() This is not a tutorial for an extremely realistic painting. It's more a impressionist-like rose. The far you see it, the colors join in your vision. It is simple so everyone can join, even if it is you first time painting watercolors.
This is not a tutorial for an extremely realistic painting. It's more a impressionist-like rose. The far you see it, the colors join in your vision. It is simple so everyone can join, even if it is you first time painting watercolors.
This is our model girl. No source, couldn't find the direct link. :(((

IMPORTANT: How to draw a rose?
The best thing to paint something is to know the structure of that something.
Roses are shaped like cups. The stem of the rose is centered with the core, where there is that beautiful yellow.
The petals are born like fish scales, one above the joint of the other two. They are NOT born exactly one above the other. (You can see it in the example. The three petals at the bottom.)
The amount of petals vary a lot. If you put too many or too few petals, you will end up making a rose, whether you like it or not. haha
I'm writing this because: I didn't take pictures. But I plan, I plan... It would be very long for only a tutorial.
Let's get started!
![]()
You will need:
Magenta.
Cadmium Red Light.
Sap Green.
Quinacridone gold. (Or ochre, or indian, any powerfull not so opaque yellow you have)
300g paper. (Cellulose or Cotton)
Water and brush medium to fine.

1. Pass a very thin layer of paint all over the rose. Very thin. Use the magenta or cadmium. Or another pink hue you have.
Let it dry.
Ignore the hare looking at you.
IGNORE.

2. Those are the colors, and other colors all messy in my palette. (i've tried a rose earlier, but it was not my better.)
I know, this should be posted as the first.

3. Now that it dried, take the brush and mix your two paints. Don't need it to be equally. Don't worry about the hues, we want it to be fun.
But pay attention, don't put too much water.
The brush must not be dry, but it must not be dripping.
We need the paint with a stronger color here.
Use your color in the shadows. No, it is not to you to paint in the corners of your bedroom. The shadows of the rose!
Don't let it dry for the next step.

4. Scumble from the inside out of the petals. Just the tips, not too much water. Let it dry for the next.

5. Dilute your red into something transparent that barely remembers red anymore. It's almost salmon.

6. Use that pale red in the most light petals and the tiny petals in the core. PLEASE, don't cover everything. Only in the tips of the petals.
Let it dry for the next.

7-8. Use a light yellow, with a bit of water, to spread it into the rose, this is up to you how much you want it. Even if you don't want it at all. Skip this step.
But I love it. It gives some warmth to the piece.
Also, this is not in the picture, but I spread the yellowish for the left bottom petal. You can see it in the next.
Let it dry for the next.

9. This red/purple color is the darkest part of the rose. Attention to not drop it in the core. The core needs to be vibrant. ^^ <3
You can use another tone of red and not use violet if you want it.
Also, you can use sepia, or dark blue.
Roses are incredible because you can use a lot of colors.
The true is, you can use a lot of colors whenever and wherever you want since you know how to deal with values. :d
But this is for another tutorial. (I'm not the expert in values neither lol)
Don't let it dry to next step.

9.1. Repeat the step number 4.
In the darkest areas, let the paint dense.
If you need it, put more dark paint to it, but don't get too much.
Can you see the dicotomy? The warmth on the left, the cold in the right.

10. OH NO ARE WE OVER?
YESSSS, this is our rose.
Pro tip: put some green on the petals too! It gets cool. This is watercolor, let it blur and put a lot of tiny little watercolor marks on it. ^^
I know, the photograph is not so fair with the colors actually, but the scan is. :P

We end our tutorial here. Any questions, just leave a comment. I love to explain stuff, really.
Next time we will paint an Old Garden Rose together. They're different, they're awesome! Fluffy petals, cabbage-like flowers that I LOVE with my very soul.
Bye bye. <3
![]()
COMMISSIONS Terms of Service
Updated 03 / 28 / 2020
Hey there! I'm Laura and this is my new watercolour Terms of Service journal!

(Luffy animated gifs still >>>much important<<<)
((commission status under my user))
- Paypal only (sorry but I'm not understanding the new DeviantART commission widget and all
") ( )
( ) - Payment first, half/half for 100+ values. The art will be send only when payment is completed.

- Refund depends on where I am with the work.
- If you live in Brazil, I can accept bank transfer.
ACCEPT
- OC (original characters)
- Fanart
- Anthropomorph
- Humanization
- Erotic
- Mature nudity
- Animals
- Scenary
- A little of blood
- VISUAL KEI (!!!!!)
DECLINE
- Porn (it's different from "erotic" in my point of view; "not explicit" is the term)
- Paraphilia (there's a lot here...)
- Inflation
- Mecha
- Copy another person's art (inspiration and reference are different)
TERMS
- Personal use only. For commercialize, contact me in Notes.
- Too much (TOO MUCH!) detailed pieces or more than one person per art has a +30% fee.
![Bunny Emoji-68 (Bouncy) [V4]](https://images-wixmp-ed30a86b8c4ca887773594c2.wixmp.com/f/db95d15b-8c0c-4bb6-b743-1beb61737925/d7n4wkh-35e7b92e-14e1-4763-b5d1-78493cc558b0.gif?token=eyJ0eXAiOiJKV1QiLCJhbGciOiJIUzI1NiJ9.eyJzdWIiOiJ1cm46YXBwOjdlMGQxODg5ODIyNjQzNzNhNWYwZDQxNWVhMGQyNmUwIiwiaXNzIjoidXJuOmFwcDo3ZTBkMTg4OTgyMjY0MzczYTVmMGQ0MTVlYTBkMjZlMCIsIm9iaiI6W1t7InBhdGgiOiJcL2ZcL2RiOTVkMTViLThjMGMtNGJiNi1iNzQzLTFiZWI2MTczNzkyNVwvZDduNHdraC0zNWU3YjkyZS0xNGUxLTQ3NjMtYjVkMS03ODQ5M2NjNTU4YjAuZ2lmIn1dXSwiYXVkIjpbInVybjpzZXJ2aWNlOmZpbGUuZG93bmxvYWQiXX0.rVh0Fj2o6qe9R-HK4ZG-FPVccbTRM2tg1tDWNi4EXJI)
- I'll work within a week and some days, varying depending on the response time of the client, creative time, etc. Be online if possible.
- You can respost, of course. I'll be glad if you link me.
- The art will go to my gallery and portfolio unless you warn me that it's confidential. Not full resolution.
- The illustration will be send with 2500 pixels or more even if your option is shipment of the original artwork.
HOW TO PROCEED
If you like my work and want a commission, send me a note or comment here saying:
- Wich type of commission do you want? (Samples bellow)
- Reference images if you have some.
- The more details about the job, the better!
- Payment. Leave the email so I can send an invoice, or ask me mine. ^^
- Contact outside Dev for reports, if you have and want it. Messenger, Twitter, Line...
SAMPLES
So you can choose the better!
FACE or PORTRAIT
A5: 25 USD / A4: 35 USD / A3: 70 USD
SINGLE BODY
A5: 40 USD / A4: 60 USD / A3: 110 USD
This is the option that usually is called "half body" or "full body", for me there is no much difference in illustrating one or another, haha. That's why I mixed up both. But: the price is for one person with not so much complicated stuff (wich is not the case for the two first illustrations bellow). Any doubts, just ask or leave a comment, I'll gladly reply. 
INK
20 up to 30 USD
SHIPPING
MATERIALS
THANK YOU FOR READING!
That's all the art stuff I can make for you!!


Merry Xmas!!!!!!!!!!!

Patreon is opened!
 ), so I tought it would be a good ideia to open the support channel. Independent artists always need it.
PATREON.
Art to persuade you. ~ kufufufu
Bonjour!
**whispers boi I love Luffy's smile so much whispers**
Firstly, THANK YOU SO MUCH for click and start to read this journal.
I’ve decided is time to practice my art bringing people’s ideas to life, and trying also to bring happiness. Of course, earning some cash, since I am an illustrator. Serious business, man. That’s what I love.

((commission status on main page))
In order to be practical to both of us:
- Paypal is preferable (but the commission widget is also available
 .)
.) - Payment first (for the single body/scene pieces we can do a half/half before and after the job)
- No refund
![Bunny Emoji-72 (Kawaii) [V4]](https://images-wixmp-ed30a86b8c4ca887773594c2.wixmp.com/f/db95d15b-8c0c-4bb6-b743-1beb61737925/d7n4whh-c765d923-a43b-49b0-ad25-626eaf2db0fb.gif?token=eyJ0eXAiOiJKV1QiLCJhbGciOiJIUzI1NiJ9.eyJzdWIiOiJ1cm46YXBwOjdlMGQxODg5ODIyNjQzNzNhNWYwZDQxNWVhMGQyNmUwIiwiaXNzIjoidXJuOmFwcDo3ZTBkMTg4OTgyMjY0MzczYTVmMGQ0MTVlYTBkMjZlMCIsIm9iaiI6W1t7InBhdGgiOiJcL2ZcL2RiOTVkMTViLThjMGMtNGJiNi1iNzQzLTFiZWI2MTczNzkyNVwvZDduNHdoaC1jNzY1ZDkyMy1hNDNiLTQ5YjAtYWQyNS02MjZlYWYyZGIwZmIuZ2lmIn1dXSwiYXVkIjpbInVybjpzZXJ2aWNlOmZpbGUuZG93bmxvYWQiXX0.ywYaU8h5pylikVwlt8uJIwWU2onjO0ZBqNM2B129S6k)
Accept/Decline
- OC (original characters)
- Fanart
- Anthropomorph/Furry
- Humanization
- Erotic
- Mature nudity
- Animals
- Scenary
- A little of blood
- VISUAL KEI (!!!!!)
- Porn (it's different from "erotic" in my point of view; "not explicit" is the term)
- Paraphilia (there's a lot here...)
- Inflation
- Mecha
- Copy another person's art (inspire and reference are different)
- Non-cannon fanart couples (it depends upon the series I guess)
- Malepreg (It depends upon the character, I do prefer is original stuff from you )
- Real people fanart couples that... aren't a real couple...?
- BDSM (convince me to draw this :bademoticon:)
Terms and details. ARE YOU READY?
- Usually I can finish within a week and two/three days. It may depend on your feedback on the processes. Also, my creative time.
- I'll do regular reports and needs of approval depending over circunstances. Be online if possible.
- I can ship the physical work to you, if you want it, but with the plus of the shipping price of my currency (which is ridiculously expensive). Usually, with no shipping, the commission I'll provide is a scanned work. 2500xp height, 300dpi. Except the sketch, that is 1000xp height. It'll feel like a digital art piece.
- Comissions are personal use only. If you want to commercialize, let's talk about it.
- You can repost, of course. Link me whenever you do it, please.
- I'll upload a 1000xp of the work on my gallery. If you want exclusivity, warn me, please².
- Don't click on the commission widget if we haven't spoken yet about the job, if you plan to use points, please³.
- Prices may differ after the briefing. For example, if your art is madly detailed and has a lot of characters on it and I'll spend some weeks on that.
If you liked the stuff and want to commissionate me...
Leave a comment here or send me a NOTE with the following information:
- Contact out of deviantART for regular reporting if possible (Facebook, e-mail, LINE, WhatsApp, VK, Instagram...)
- You have no ideia what you want? I can create something with you!
- Reference images, if you have.
- What comission type you would like? Watercolor? Sketch? Personal budget? [...]
- The more details about the job, the better!
- Payment method.
If the type is watercolor, AFTER we finish the briefing process and value check, I'll kindly ask you to send me your e-mail from paypal account, so I can send you an invoice. Or you'll click on the commission widget (I can create a personalized for you, too).
ARTWORK SAMPLES.
Base prices, essentially A5. Contact me for your personal budget. ^^
FACE/BUST
2500 points or 20 USD
SINGLE BODY
4500 points or 40 USD
SKETCH
3 to 10 USD, it depends on what you want.
(please, see the commission widget on homepage to each price/level)
scanned work with digital flat color to taste
WHAT I SPECIALLY LOVE TO DRAW
and is good to you to know
Colorful fabric (blue and yellow ochre included), feathers, roses!
For real.
That's all the stuff I can make for you!